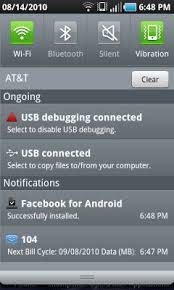
Le but de ce tutoriel est d’apprendre à utiliser les notifications
sous Android et de prévenir les utilisateurs de vos applications d’un
événement particulier ou interagir avec eux.

Nous allons créer un projet qui comprendra deux boutons :
Le fichier “strings.xml” pour rajouter les différentes strings pour le texte des boutons
Voici le résultat que vous allez obtenir.

Je vous met l’icone que j’ai utilisé pour la notifcation  .
.
Il suffit maintenant d’appeler la méthode dans votre code, ce qui donnera :
Il faut rajouter la permission “Vibration” dans l’AndroidManifest.xml
et les nouveaux textes dans le fichier “Strings.xml”


Qu’est qu’une notification ?
Une notification est une indication qui s’affiche sur la barre qui se situe en haut d’un téléphone Android. Cette notification sert à prévenir un utilisateur de certains évènements, comme la récéption d’un message par exemple.Nous allons créer un projet qui comprendra deux boutons :
- Un pour créer une notification
- Un autre pour en supprimer
- Nom du projet : tuto_notification
- SDK : 2.1
- Nom de l’application : Tuto Notification
- Nom du package : com.tutos.android.notification
- Activité : TutoNotificationHomeActivity
Création de la vue principale
Nous allons modifier le fichier “main.xml” afin d’avoir deux boutons. |
<?xml version="1.0" encoding="utf-8"?><resources> <string name="add_notification">Ajouter une notification</string><string name="delete_notification">Supprimer une notification</string> <string name="app_name">Tuto Notification</string></resources> |
Rajouter le Listener sur les boutons
Nous allons rajouter des “Listener” sur les boutons pour gérer le clique. Ce qui donnera sur la classe “TutoNotificationHomeActivity”packagecom.tutos.android.notification;importandroid.app.Activity;importandroid.os.Bundle;importandroid.view.View;importandroid.view.View.OnClickListener;importandroid.widget.Button;importandroid.widget.Toast;publicclassTutoNotificationHomeActivityextendsActivity {privateButton addNotificationBtn;privateButton deleteNotificationBtn;@OverridepublicvoidonCreate(Bundle savedInstanceState) {super.onCreate(savedInstanceState);setContentView(R.layout.main);addNotificationBtn = (Button) findViewById(R.id.add_notification);addNotificationBtn.setOnClickListener(newOnClickListener() {@OverridepublicvoidonClick(View arg0) {Toast.makeText(getBaseContext(),"Ajout d'une notification", Toast.LENGTH_SHORT).show();}});deleteNotificationBtn = (Button) findViewById(R.id.delete_notification);deleteNotificationBtn.setOnClickListener(newOnClickListener() {@OverridepublicvoidonClick(View arg0) {Toast.makeText(getBaseContext(),"Suppression d'une notification", Toast.LENGTH_SHORT).show();}});}}
Création d’une notification.
Nous allons créer une méthode “createNotification” qu’on appelera au clique sur le bouton “Ajouter une notification”. Voici a quoi ressemble cette méthode :
private final void createNotification(){

   //Récupération du notification Manager

       final NotificationManager notificationManager = (NotificationManager)getSystemService(Context.NOTIFICATION_SERVICE);


       //Création de la notification avec spécification de l'icone de la notification et le texte qui apparait à la création de la notfication

       final Notification notification = new Notification(R.drawable.notification, notificationTitle, System.currentTimeMillis());


       //Definition de la redirection au moment du clique sur la notification. Dans notre cas la notification redirige vers notre application

       final PendingIntent pendingIntent = PendingIntent.getActivity(this, 0, new Intent(this, TutoNotificationHomeActivity.class), 0);


       //Récupération du titre et description de la notfication

       final String notificationTitle = getResources().getString(R.string.notification_title);

       final String notificationDesc = getResources().getString(R.string.notification_desc);


       //Notification & Vibration

       notification.setLatestEventInfo(this, notificationTitle, notificationDesc, pendingIntent);

       notification.vibrate = new long[] {0,200,100,200,100,200};


       notificationManager.notify(NOTIFICATION_ID, notification);

   }
Il suffit maintenant d’appeler la méthode dans votre code, ce qui donnera :
addNotificationBtn = (Button) findViewById(R.id.add_notification;addNotificationBtn.setOnClickListener(newOnClickListener() {@OverridepublicvoidonClick(View arg0) {createNotification();}
});
<uses-permissionandroid:name="android.permission.VIBRATE"/>
<stringname="notification">Notification www.tutos-
android.com</string><stringname="notification_title">Ma premiere notificationwww.tutos-android.com</string><stringname="notification_desc">Cliquez sur moi je suis une notification</string>
Suppression d’une notification
Nous allons créer une méthode “deleteNotification”, pour supprimer notre notification depuis l’application.
privatevoiddeleteNotification(){finalNotificationManager notificationManager = (NotificationManager)getSystemService(Context.NOTIFICATION_SERVICE);//la suppression de la notification se fait grâce a son IDnotificationManager.cancel(NOTIFICATION_ID);}Puis l’appeler dans le code Java au moment du clique
deleteNotificationBtn = (Button) findViewById(R.id.delete_notification);deleteNotificationBtn.setOnClickListener(newOnClickListener() {@OverridepublicvoidonClick(View arg0) {deleteNotification();}});

0 commentaires:
Enregistrer un commentaire